
You may have come across websites with ‘http’ or ‘https’ at the beginning of the address bar in your web browser. The difference between the two is that https is the secure port. A secure https connection can be made when you have an SSL certificate installed on your website.
In this article, you’ll learn what SSL and HTTPS is and why you should use it.
What is HTTPS?
HTTPS is the secure HTTP protocol that uses SSL/TLS for encryption.
When connecting to a website over HTTPS, the connection is secure and users can transmit sensitive data such as credit card information, login details and personal details in an encrypted form.
Put simply, this will make the data not readable by humans.
It protects users against eavesdropping attacks, where attackers will steal user information that’s transmitted through the browser to the website. If data is transmitted using the standard HTTP protocol, the data is human readable, making the connection vulnerable to attack.
Why do you need HTTPS and SSL?
In recent years, SSL and HTTPS has been adopted to become the standard protocol making the internet more secure.
Google Chrome launched an update for their browser in January 2017, where web pages with data input fields for passwords and credit card information are marked as ‘not secure’ if the webpage is served over a non-secure (HTTP) connection.
Since update 68 (released in July 2018) Google Chrome marks the site as ‘not secure’ if the site is connected over the non-secure port even if there aren’t any input fields for sensitive information on the webpage. This is the same for other browsers such as Mozilla FireFox, Safari and Microsoft Edge.
Here’s the message in Chrome:

In Firefox:

And in Edge:

The ‘not secure’ message doesn’t fill users of your website with confidence. They’ll likely leave the website within a few seconds.
The following graph shows statistics from a survey that Comodo sent out to 350 US adults. They were asked ‘What would you do if you saw this “Not secure” message when you visit a website?’
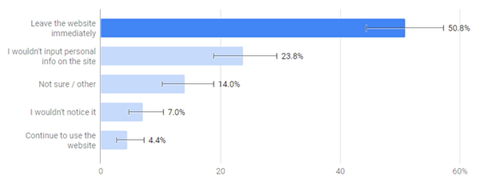
The majority said that they’d leave the website immediately and not input personal data on the website.
So it’s a no-brainer to get one installed. Now, we’ll go through the process of moving your site to HTTPS.
Enabling an SSL on a domain name
At 20i, we offer free SSL certificates through Let’s Encrypt.
The free SSL certificates are ‘wildcard’, so will cover all subdomains under your domain name. This includes the vanity host name for your email service such as mail.domain.com, so you can connect your email over secure ports within your mail client such as Microsoft Outlook.
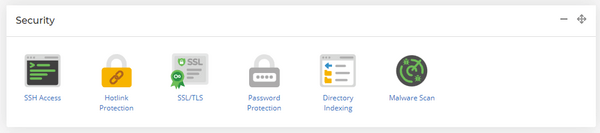
You can enable the Free SSL certificate from within your My20i hosting control panel > Manage > SSL/TLS.
From the ‘SSL/TLS’ page you’ll see the option to ‘Activate Free SSL’. The SSL certificate will be installed and active on your website in 30 minutes.
Your domain will need to be using our nameservers, as this is how we validate the SSL certificate. We also offer Simple SSL certificates and Extended Validation SSL certificates which can be bought for your domain if you prefer not to use our nameservers.
You can buy them from this page in My20i. Both of these certificate types include a warranty which is not available with the Free SSL certificate.
The Simple SSL and Extended Validation SSL certificates will require a validation process through email which is sent to the admin@domain.com email address. Once validated, the SSL certificate will be installed and active in 30 minutes.
Change HTTP to HTTPS: redirect your website
Once you’ve installed or validated your SSL certificate, you’ll be able to connect to your website over HTTPS.
However, the default connection method will still be HTTP, so the next step is to ensure that your default connection is HTTPS. There are various methods in which you can achieve this, but first…
Back up your site before you start!
It’s always recommended to back up your website before you make any changes to your website’s code. If anything goes wrong, you can always revert back to the last known working copy and start from there.
We have some tools available in My20i where you can take a backup of your website and database (and even email, if you want).
If you have Timeline Backups, you can take a snapshot of the webspace and database and this will be saved in the snapshot list. It will be ready for you to restore if you need to do so. You can find timeline backups via the My20i hosting control panel > Timeline Backups.

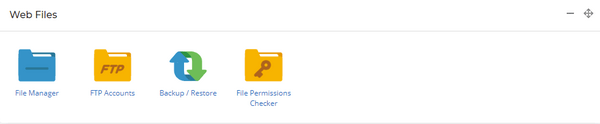
If you don’t have Timeline Backups, you can find ‘Backup/Restore’ in the ‘Web Files’ panel. From here, you’ll be able to download a copy of your website files and database into a .zip file, ready for restoration.
How to make a backup if you don’t use 20i
If you don’t have a backup tool available to you at your current hosting provider, you should be able to download the folder with your website files via FTP and your database using PHPMyAdmin.
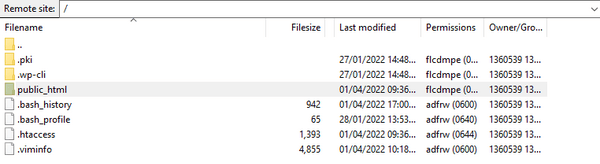
If you connect over FTP, you can download the public_html folder or the folder where your website files are stored by right clicking on the folder and selecting ‘Download’. FTP stands for File Transfer Protocol: it’s the protocol used to transfer files from a server to a client over a network.
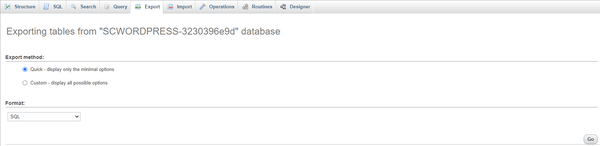
To download the Database via PHPMyAdmin, you will just need to log into your database via PHPMyAdmin > Select the database which you want to download > Select the ‘Export Tab’ > Select ‘Quick’ Export Method > Go.
Add an SSL to your website using a plugin
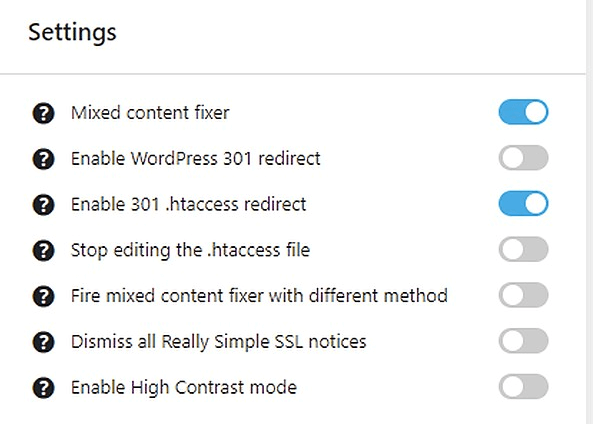
If you use WordPress, there are various plugins you can use to help with the change to https. One we’ve tested and recommend is Really Simple SSL.
This particular plugin will enable the 301 redirect in WordPress, which will redirect http to https.
In addition to this, there are other options available to fix ‘mixed content’. Mixed content is where some of your website’s resources are still using the non-secure port. Things like stylesheets, images and scripts may be requested over HTTP and not HTTPS. The mixed content fixer will resolve this.
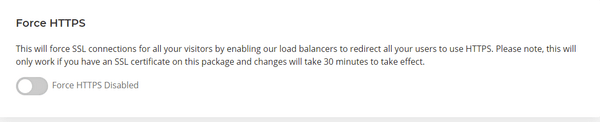
Using Force HTTPS
One of the features in My20i hosting control panel is an option to ‘Force HTTPS’. It has nothing to do with Star Wars, unfortunately.
Turning this on will redirect all users to use HTTPS at the load balancer level in our servers. This can be found in the same place to enable the Free SSL certificate (My20i hosting control panel > Security > SSL/TLS).
How to do redirect to HTTPS manually
If you’re not able to redirect using the methods above, you can create a redirect rule in your .htaccess file.
The .htaccess file is a configuration file which is used to alter apache webserver functionality without having to modify the apache configuration files.
Typically, you’ll find the .htaccess file in the root directory of your website or the public_html folder.
Some hosting providers may have the file hidden as a security measure. You may need to enable “Show Hidden Files” if you don’t see the .htaccess file, but you can always create the .htaccess file if it isn’t already present in your webspace.
Here is a tested example Force HTTPS .htaccess rule you can try, I tested these in the .htaccess file in the root directory of the webspace:
RewriteEngine On
RewriteCond %{env:HTTPS} =off
RewriteRule ^(.*)$ https://%{HTTP_HOST}%{REQUEST_URI} [L,R=301,NE]
In the above, ‘RewriteCond %{env:HTTPS} =off’ checks to see if the connection is the non-secure HTTP type and if it is, the next line is then put into effect. This line ensures that all HTTP requests are redirected to HTTPS using a 301 (permanent redirect).
Here’s another. In this one, be sure to replace EXAMPLE.COM with your domain name. The following will take the HTTP request and redirect this to HTTPS.
RewriteEngine On
RewriteCond %{SERVER_PORT} 80
RewriteRule ^(.*)$ https://www.EXAMPLE.COM/$1 [R=301,L,NE]
It uses a different method for the same results. ‘RewriteCond %{SERVER_PORT} 80’ checks if the request is made over port 80 (which is the HTTP port) and if the condition is met, the next line is executed. This will rewrite all connections from port 80 using the 301 status to HTTPS.
Too many redirects?
If you add these rules to your .htaccess file when there is already content in there, note that you may encounter a ‘Too Many Redirects Error’. The cause of this would usually be due to conflicting 301 rules. If you’re unsure of what’s causing the conflict, we’d recommend seeking developer help.
So, hopefully you’ve got your SSL installed, and your redirects are in place. There are a couple of easily-forgettable things to do before you finish. But don’t worry: it’s all downhill from here!
Submit your HTTPS site to Google Search Console
Adding an SSL certificate and ensuring that your site resolves to HTTPS should give your website a slight ranking boost in the search engine results. As John Mueller says at 2:27:
Google Search Console is a free service that will help you monitor website’s visibility in Google Search results as well as its overall performance.
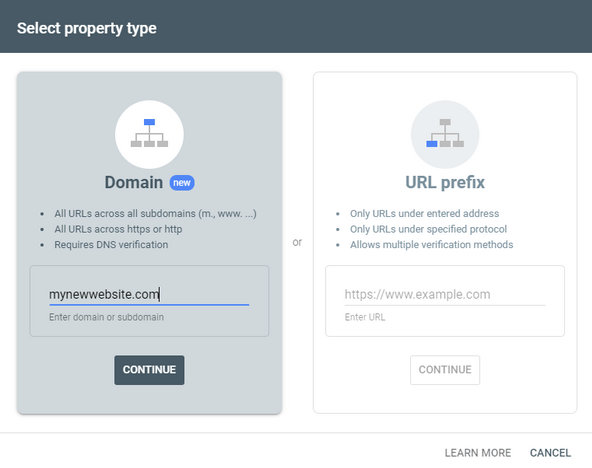
It’s nice and easy to submit your website to Google Search Console. You’ll just need a Google account and a browser.
You’ll first be prompted for your domain name:
Once you’ve done this, Google will need to verify your domain, using a TXT record.

Copy the TXT record and add this to your DNS settings.
If your nameservers are managed at 20i you’ll find the DNS settings in the Domain management area from within My20i.
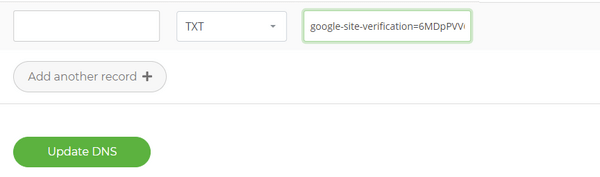
After updating the DNS, TXT records are propagated and the HTTPS version of your site will be verified.
Google Analytics and HTTPS
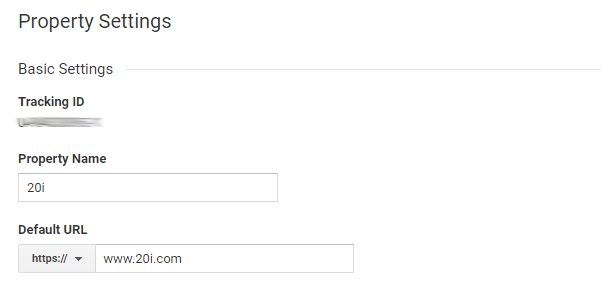
Unless it’s a completely new site, you’ll also need to ensure that you don’t lose all your history in Google Analytics.
You can do this by going in to Admin > Property Settings, and change the ‘Default URL’ to ‘https’ using the dropdown.
If you’ve linked Google Analytics with Search Console, you can also update it to the secure version of your domain here.
If you’re using Google Analytics 4, then it’s a similar process. Under Property Settings > Data Streams, select ‘Add stream’. Choose the stream type to be ‘web’.
Use the dropdown and choose HTTPS. Then add your website URL, name the stream, and click on ‘Create Stream’. You’re done!
Of course, you may use different analytics tools. We can’t cover them all here, but rest assured, the process is fairly similar across all of them and there are tutorials out there.
Now your site is more secure, for you and your users
Hopefully this article has given you some insight to the importance of having a valid SSL certificate installed and connected over HTTPS – and how to do it.
Even if your website is not accepting financial transactions or requesting sensitive data input, installing an SSL certificate can improve your ranking and give your users confidence when visiting your website.
Let us know if you have any questions below, or contact our friendly support team if you’re having issues.