WordPress comes with a with a range of fonts that are ready for web designers to use. With an estimated 43% of all websites (around 810 million at the time of writing) built on the platform, using different fonts can help your website to stand out.
Custom fonts enable you to better establish the identity of your brand, increase readability and make for an overall better and more unique experience for your visitors.
In this guide, we will be taking a look at several ways of installing custom fonts onto your website so that you can choose what method works best for you.
Find custom fonts to use in WordPress
WordPress themes do not contain all fonts in existence. There are, however, various free and paid sources you can use to get the fonts that you need into WordPress, the main two being Google and Adobe.
Google Fonts
Beginners and experienced users alike utilise Google Fonts as they are quick and easy to get up and running.
Other benefits include the wide variety of fonts, performance (fonts are served from Google’s servers and fast content delivery helps SEO), they are updated regularly and, perhaps most attractively of all, they are open source and free to use!
Adding Google Fonts To WordPress Using a Plugin
As with most things WordPress related – there is a plugin for that. In this case, it called Google Fonts Typography by Fonts Plugin.
To install the plugin, log into your WordPress website via wp-admin. After you are signed in an at the main WordPress menu you’ll need to hover your mouse cursor above where it says “Plugins” in the menu on the left, and click on “Add New Plugin”.
The Add New Plugin screen should load after a few seconds. Type “Google Fonts Typography” into the search bar in the top right and you should see the plugin appear as the first result.
Click “Install Now” then press the “Activate” button. Once the plugin is activated a “Fonts Plugin” item will appear in the menu on the left. Click “Customize Fonts” in the admin side bar.
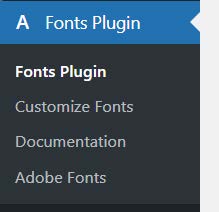
This will take you to the theme customiser in WordPress, and should open the Fonts Plugin section.
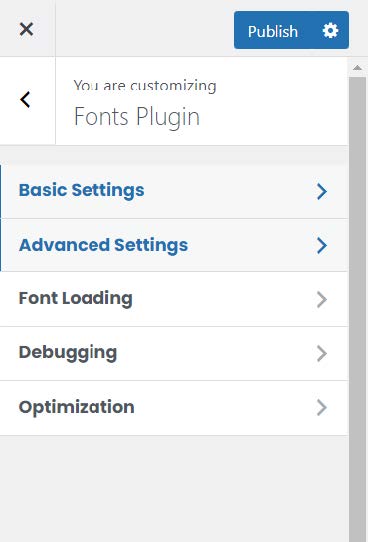
Clicking “Basic Settings” will allow you to change the default fonts for your website. “Advanced Settings” lets you change fonts for specific areas.
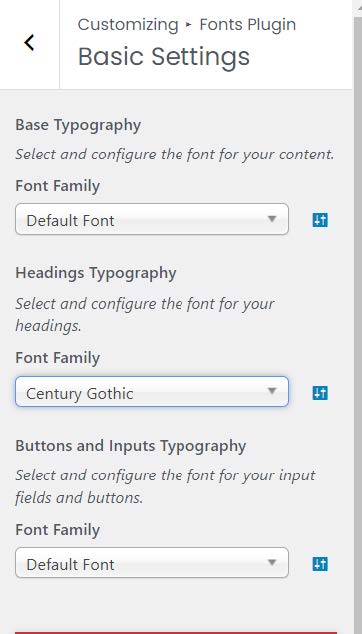
Basic Settings
Basic settings let you change the font for your Headings, Buttons and written content.
The drop-down menus under “Font Family” gives you a list of fonts to choose, with your current default font at the top of the list. After choosing a font, you will see a preview.
Advanced Settings
Advanced Settings presents the same options as Basic Settings but broken down into more granular options, so you can fine tune your selections.
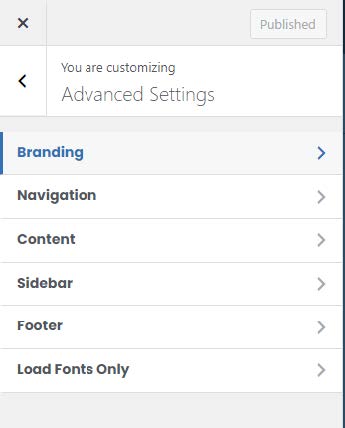
Here is a brief description for each option:
Branding — Change the font of your site title and description.
Navigation — Configure the typography of navigation menus.
Content — Make changes to your content typography as well as each of the heading tags
Sidebar — Font controls for sidebar headings and content.
Footer — Font control for sidebar headings and content the site footer.
You can choose which font you’d like to use by selecting the font from the drop-down menu. When you’re happy with your choices, you can then click “Publish” for your changes to go live.
Adding Google Fonts manually
In this example, we will cover downloading a font from Google’s font library, uploading it to your website and modifying your WordPress theme files so that they use the new font.
Use this link to go to the Google Fonts library. Find and click on the font you want to use. The Type Tester will load. This tool lets you preview and try different weights (thicknesses) within the font family that you chose.
Some fonts have multiple weights, ranging from Light to Extra Bold. Other fonts have just a single weight.
When you have decided which weights to download: click the (+) symbol. You can select more than one weight at a time, which is ideal if you would like your website to use Bold, Light and Italic variations of a font.

With the font(s) selected, the website will generate the code that you will need to use in the WordPress CSS file.

Click the blue “Download all” button in the bottom right to download a zip file contains your font(s). Unzip the files and upload them to your theme directory using the File Manager in My20i or by FTP. If you do not already have a font directory, you can create this manually.
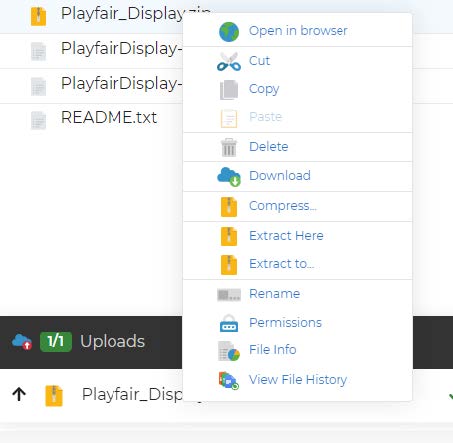
With the font uploaded it is now time to modify your CSS and function.php files.
- You can either modify the files via the file manager or via wp-admin > Tools > Theme File Editor.
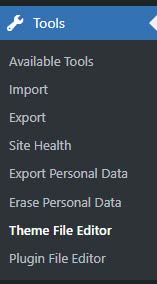
- Add this to code to the top or bottom of your CSS file:
@font-face {font-family: your-font; src: url(https://domain.com/path/to/your/font/file); font-weight: normal;}
Replace the bits in bold with the name of the font you want to use and the URL path with where you stored the font on your website. You can get the font family information from where you downloaded the font file.
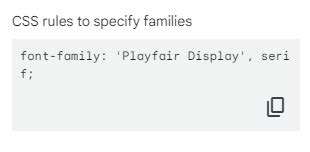
You can specify where you would like your font to take effect. In my example, I’ve specified the ‘h1’ tag
h1 {font-family: 'Playfair Display', serif;}
- Modify the themes functions.php file by adding this code:
function enqueue_custom_styles()
{ wp_enqueue_style('custom-fonts', get_stylesheet_uri() ); }
add_action('wp_enqueue_scripts', 'enqueue_custom_styles');
Adding this code will include the “style.css” file (which includes the styling rules for the font we want to use) when a user visits the front end of the WordPress site.
wp_enqueue_style is a WordPress function used to enqueue stylesheets. In this case, it’s being used to enqueue a stylesheet named “custom-fonts”. The get_stylesheet_uri() function handles the URL of the main theme’s style.css file.
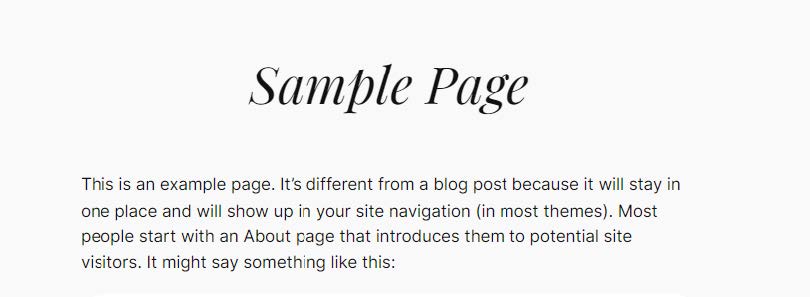
Save the changes and check your website. Be sure to clear your browsers cookies and cache. You should see your new font take effect on the website.
Use Google Font API
Using Google Font API externally is another quick and easy way of getting custom fonts on your website. The benefits of this method are that you don’t need to download and then upload font files to your website.
Calling directly to Google’s API will give you the most up to date style sheets and Google’s servers are fast, so page content will be delivered very quickly.
Here are a few ways you do can do this:
Using wp_enqueue _style (recommended)
The WordPress function wp_enqueue _style is performant, allows for asynchronous loading and aligns with WordPress’s architecture.
Below you will see how we have enqueued the stylesheet for the Google Fonts API. It uses the handle ‘fonts’, and the second parameter is the URL of the Google Fonts stylesheet.
function my_theme_enqueue_styles() {
wp_enqueue_style( 'my_theme_style', get_stylesheet_uri() );
wp_enqueue_style('fonts', 'https://fonts.googleapis.com/css2?family=Roboto:ital,wght@1,100;1,400&display=swap'); }
add_action( 'wp_enqueue_scripts', 'my_theme_enqueue_styles' );
Use ‘@import url’ via your websites CSS file
Outside of using a plugin; this is the easiest method as you can add it directly to your CSS file and there is no need to understand WordPress functions or modify PHP file.
The drawback is that it is the least performant. This is because the browser fetches the imported stylesheets sequentially – every imported stylesheet must be loaded and processed before the browser moves onto the next, which results in slower page speed load times.
To use this method; add this line of code (replacing the URL with your desired font’s URL) to your themes CSS file.
@import url('https://fonts.googleapis.com/css2?family=Playfair+Display:ital@1&display=swap');
You can find the @import code from the Google Fonts library, where you selected the Font style.
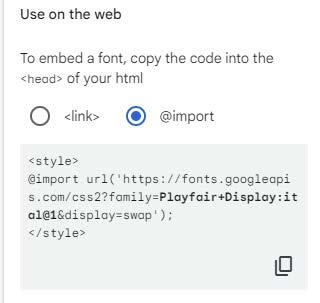
Remember update your themes CSS file to specify the font that you would like to use i.e
h1 {font-family: 'Roboto', serif;}
For optimal performance and flexibility, it’s recommended to use wp_enqueue_style to include external stylesheets in WordPress themes. While @import is simpler, it may not offer the same level of performance optimisations.
Adobe Fonts
Adding Adobe fonts into WordPress is similar to adding Google fonts using the methods above. The main difference is that you need to sign up to Adobe Fonts before you can select a font from the library.
Another significant difference is that not all fonts that you will see on Adobe Fonts are free and open source.
To manually embed the font into your website, select the option “Add to Web project”

If you do not already have a project, you can create a new one:
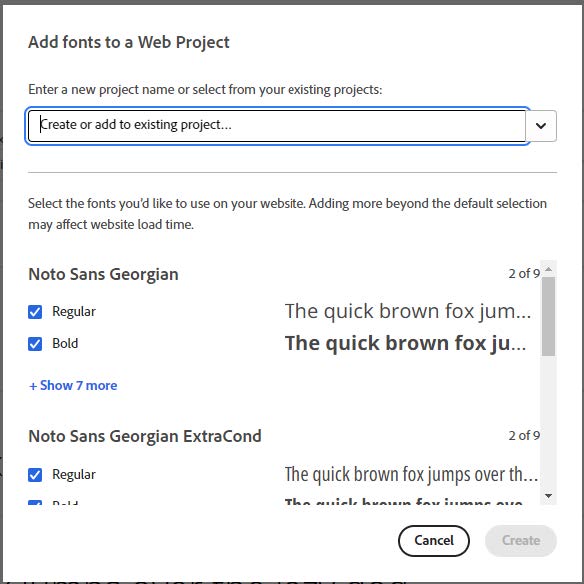
After clicking “Create” you will be given the code to copy into your website.
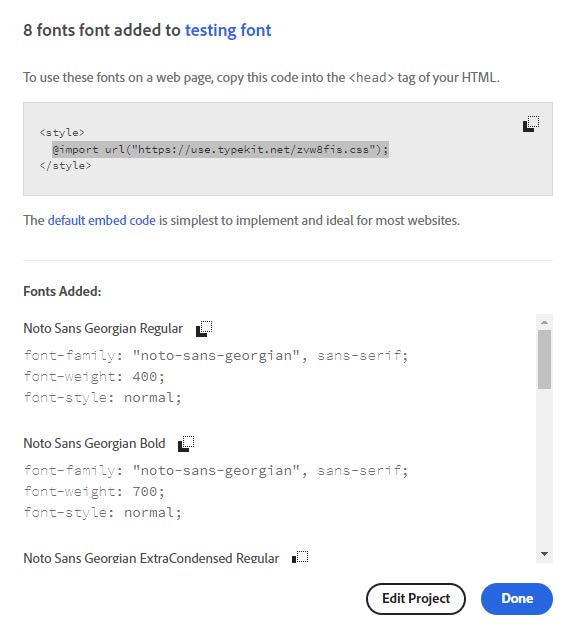
You then have the option to use <link rel= href "https://use.typkit.net/fontid.css" or import @url.
As with Google fonts, you can use the Adobe Font API URL in your wp_enqueue_style code and add the font family into your CSS file. Alternatively, you can add the “import URL” code to your CSS file.
Final thoughts
In this article, we explored several different ways of adding custom fonts into WordPress, staring with using a simple plugin and moving onto adding them manually and using APIs.
The easiest method is to use a plugin. Better performance and flexibility can be achieved using the advanced method and modifying your functions.php file using wp_enqueue_style function.
If you’re not comfortable modifying your websites PHP code, you can experiment on a fresh WordPress install.
I hope that you found this guide to be useful. Please feel free to share it with anyone you know that needs it and, if you know of any other methods of getting custom fonts onto your WordPress website – please let us know in the comments section!


Add comment