Maybe you’ve received a security alert. Or maybe your site has started redirecting to spam pages. What do you do if you’re worried your website has been hacked?
In this article, we’ll help you diagnose the symptoms of a hacked site and take you through some of the 20i tools you can use to confirm a security breach, fix the problem and prevent future attacks.
How to tell if your WordPress website has been hacked?
Some signs of hacking are clear and easy to spot. On the whole, opening your site homepage will provide you with your first clues.
Obvious signs include:
- Security warnings from your search engine and/or browser when attempting to open your site
- Unusually slow load times
- Homepage being defaced or broken
- Code fragments appearing on your website
- Website redirecting to another, spammy-looking website
- Page titles appearing differently in search engine results
- Not being able to gain access to wp-admin
- White screen of death
Other signs are less obvious and can go under the radar for a time. These may include:
- High volumes of site traffic coming from other countries
- Sent emails ending up in recipients’ spam folders
- WordPress files that have been modified. Hackers can make changes to files without leaving visible front-end signs.
If you’re experiencing any of these symptoms, the hacker may have full access to your website without you knowing.
What to do if you suspect your site has been hacked
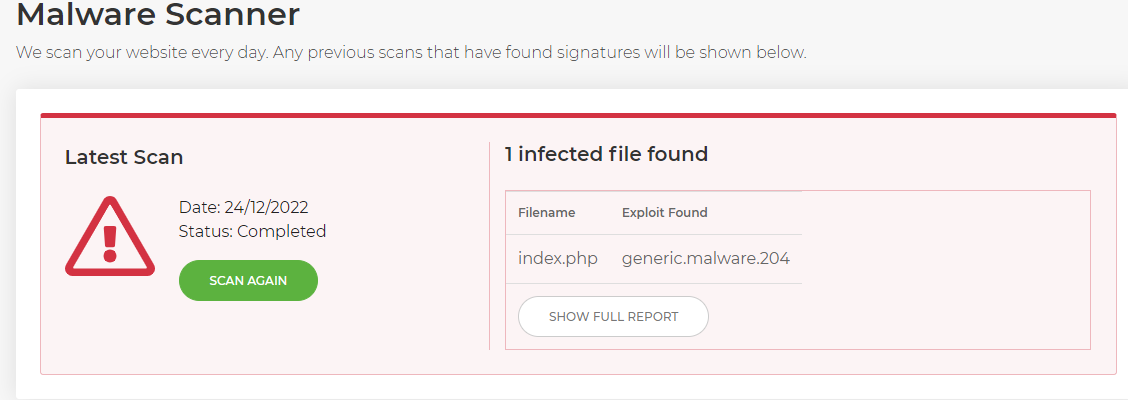
1. Run the 20i Malware Scanner
If you have encountered any of the above signs or you have other suspicions, you should run a malware scan on your website using the free 20i Malware Scanner.
When the scan is complete, it will either give you the all-clear or confirm that malware has been detected. If it has found malware, you will be given the direct file path for the infected file.
Our system will automatically scan your website files for malware everyday if you have selected this option in your My20i account preferences.
2. Inspect the file for suspicious coding
The image above confirms that, in this instance, the index.php file for a WordPress website is malware-infected. It shows the direct file path to the file itself. Your 20i file manager will also highlight the file as being infected to save you the time and effort of filtering through files.

In our example here, the Malware Scanner has inspected the infected index.php file and found the following snippet of code:
<?php

$x_yz_z_yyz=urldecode(“%6f%41%2d%62%4e%6e%4b%37%4c%35%5f%4a%55%74%52%78%49%59%2b%57%43%61%39%33%56%6b%30%77%4d%31%4f%65%53%44%64%42%32%6a%2f%6c%73%58%66%71%70%68%6d%2a%54%47%76%51%48%72%50%79%63%5c%34%7a%75%46%36%69%5a%67%38%45”)
Use the checksum report tool found in WordPress tools. The checksum tool will check the installed WordPress files against the official files, to ensure that the files have not been compromised or removed.
You can also use WP-CLI via SSH to run a checksum report:
-bash-4.2$ wp core verify-checksums Warning: File doesn't verify against checksum: index.php The image below shows a complete checksum report and that the index.php file failed verification. We can now confirm that the website has been compromised.

3. Check your database
After confirming that the website files have been compromised, you will want to check your database for any users that you do not recognise. There are a few ways you can do this.
If you’re using our Managed WordPress platform, check users via the WordPress toolset. The toolset allows you to easily remove any users that you do not recognise.
Alternatively, you can do this via PHPMyAdmin which you can find via My20i. Sign into your website’s database and find the table ‘wp_users’ from the column on the left-hand side. Here you will see the created users.

If you see any users that you do not recognise, you can simply remove them by clicking ‘Delete’ on the user row.
Another option would be to use WP-CLI to check the users by running the command ‘wp user list’ via SSH.

You can then delete any users by running ‘wp user delete’ followed by the user login, user email, or user ID e.g. ‘wp user delete 1’
4. Filter the access logs for suspicious activity
The access logs can provide useful information to help identify suspicious activity and enable you to find suspicious IP addresses. The easiest way to find suspicious IP addresses in My20i would be to use the search tool in the ‘access/error logs’ and search for the time stamp for when the infected file was last modified. You should see some activity here.
With the My20i File manager, you can right click on the infected file and select ‘File Info’ from the menu.
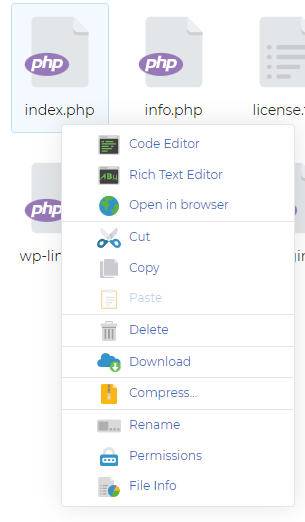
A pop-up window will appear with information relating to the file including the ‘modified’ time stamp information. You can then copy and paste the time stamp into the access/error log search area. This will filter the access logs for activity during that time stamp.

You will want to look for IP addresses and User-Agents (i.e. bot crawler) and block any that appear to be suspicious.
There are various types of ‘bad’ bots such as:
- DDOS These types of bots work together in a botnet and aim to overwhelm the network capacity. Our 1tbps Anti-DDoS protection will combat this.
- HackerBots These target your website’s infrastructure, such as known vulnerabilities in plugins. Our WAF will protect your website from attacks such as XSS and MySQL injection.
A google search for the user agent/bot crawler found in the access log can provide you with useful information and using a whois online tool such as https://www.domaindiagnosis.com/ can you give you information on the IP address allowing you to make a judgement.
How to read access logs
The following is a snippet of an example log file:
staging.20i-demo.com 185.146.164.254 - - [01/May/2023:14:56:27 +0100] "GET /wp-admin/edit.php?post_type=page HTTP/1.1" 200 167427 "https://staging.20i-demo.com/wp-admin/" "Mozilla/5.0 (Windows NT 10.0; Win64; x64) AppleWebKit/537.36 (KHTML, like Gecko) Chrome/112.0.0.0 Safari/537.36"

staging.20i-demo.com 185.146.164.254 - - [01/May/2023:14:56:43 +0100] "POST /wp-admin/admin-ajax.php HTTP/1.1" 200 67 "https://staging.20i-demo.com/wp-admin/edit.php?post_type=page" "Mozilla/5.0 (Windows NT 10.0; Win64; x64) AppleWebKit/537.36 (KHTML, like Gecko) Chrome/112.0.0.0 Safari/537.36"

staging.20i-demo.com 185.146.164.254 - - [01/May/2023:14:56:58 +0100] "POST /wp-admin/admin-ajax.php HTTP/1.1" 200 67 "https://staging.20i-demo.com/wp-admin/edit.php?post_type=page" "Mozilla/5.0 (Windows NT 10.0; Win64; x64) AppleWebKit/537.36 (KHTML, like Gecko) Chrome/112.0.0.0 Safari/537.36"
At first, this may not mean much but it does tell us some activity. We’ll break down the information and analyse the above.
- 185.146.164.254 – The IP address of the client that made the request
- [01/May/2023:14:56:58 +0100] – The date and time of the request
- 200 – Response code
- 67 – Size of the object being returned to the client
- “POST /wp-admin/admin-ajax.php HTTP/1.1″ 200 67 “https://staging.20i-demo.com/wp-admin/edit.php?post_type=page” – Request type and requested URL
- “Mozilla/5.0 (Windows NT 10.0; Win64; x64) AppleWebKit/537.36 (KHTML, like Gecko) Chrome/112.0.0.0 Safari/537.36” – User Agent, which identifies information on the browser the client is using to access the URL.
In the example access logs above, we can see that the IP of the client edited a WordPress page in the WordPress admin area.
How to identify suspicious activity in the access logs
The obvious signs of suspicious activity in the access logs would be frequent access to /wp-admin and the wp-config.php file. A good way to see what the accessing IP address or bot was doing would be to use the access log search tool to filter the access logs for that IP address. You can then see what areas of the website the IP address was trying to access.
Some useful SSH commands
You can request access logs from your host, upload them to your webspace and filter the logs using SSH.
Here are some SSH commands using ‘grep’ which would help:
The ‘grep’ command will search for lines of the given text in a file.
grep ‘timestamp’ /path/to/access.log This will filter the timestamp in the access log. You will want to replace ‘timestamp’ with the time you’re looking for e.g.
grep ‘01/May/2023:14:56’ /path/to/access.log grep -w ‘ipaddress’ /path/to/access.logThis will filter the logs for the IP address. You may want to see how many times the IP address has accessed the website in which case we can use the ‘wc’ flag:
grep ‘ipaddress’ /path/to/access.log | wc -l If you see an IP address trying to access your website 100s or 1000s of times in a short time period, this could indicate an attack on the website.
You can also filter for the top 10 hitting IP addresses using the following command:
cat /path/to/access.log | awk ‘{print $2}’ | sort –n | uniq –c | sort –nr | head 10 In summary, being able to read the access logs will give you more of an idea as to what activity occurred around that time stamp. Now that you understand how to read access logs, you can find the suspicious user-agents and IP addresses and block against these.
You can block IP addresses using our ‘Block Visitors’ tool and block bad user-agents using the following .htaccess rule and insert the user-agent on the line
“RewriteCond %{HTTP_USER_AGENT} “

Options +FollowSymLinks

RewriteEngine On

RewriteBase /

RewriteCond %{HTTP_USER_AGENT} insert-bad-user-agent-here [NC]

RewriteRule ^ - [F,L]
5. Summary and recovery
WordPress website compromises usually take place because of weak scripting in the website, such as outdated plugins, themes and core versions.
Our Malware scanning tool will scan your website and send you a report allowing you to check when the files were modified.
The easiest way to recover a website is to roll back a last known clean backup, before the infected files were last modified. You can easily restore backups within My20i using ‘Timeline backups’, where your website is backed up every day.
You can also restore the backup to a separate folder in the webspace and inspect the files before overwriting your existing website with the backup data. Following this, you can run a malware scan to ensure the backup is clean.
When you’ve restored your backup and run another malware scan to confirm that the data is clean, you can then run any updates on the plugins, themes and core versions to help strengthen security. You can also check your installed plugins, themes and core version against Wordfence’s database for known vulnerabilities.
For help with any concerns, the 20i support team is available 24/7 via live chat or support ticket. We’re here when you need us, with quick responses and resolutions.